FIELD GUIDE / QUESTS
The Last Taxi: All Seven Locations and Puzzle Solutions
The Last Taxi has one cab in each of CONTROL Resonant's seven major zones. Entering a cab takes Dylan to a Threshold street, where he answers Mila's payphone and usually solves three rounds of “which taxi is different?” The Park is the exception:…
The Last Taxi has one cab in each of CONTROL Resonant's seven major zones. Entering a cab takes Dylan to a Threshold street, where he answers Mila's payphone and usually solves three rounds of “which taxi is different?” The Park is the exception: its cab must be repaired. You may tackle the zones in any order as they become accessible; the Unknown normally comes late in the story.
YOUR PROGRESS
Your collection checklist
Marks are saved in this browser only. This is a guide checklist, not your game save.
Enable JavaScript to save checklist progress.
The Last Taxi has one cab in each of CONTROL Resonant's seven major zones. Entering a cab takes Dylan to a Threshold street, where he answers Mila's payphone and usually solves three rounds of “which taxi is different?” The Park is the exception: its cab must be repaired. You may tackle the zones in any order as they become accessible; the Unknown normally comes late in the story.
A wrong choice flashes red and lets you retry the current round. It does not erase earlier green lights. Choosing Abandon from the menu is different and can reset that cab's Threshold sequence.
Find the starting cabs
| Zone | Where to look | Clue type |
|---|---|---|
| Downtown | Traffic jam at the north end of the Deserted Area road | Roof signs that react to your distance |
| Central | Dead-end alley west of the Patterned Factory, beyond the Field Office | Front, rear, and roof lights |
| Evacuation Zone | Hazard alley west of the Evac Building, near the laser barriers | Headlight rhythm |
| West Incursion Zone | High parking spot above Empire Avenue Station; climb with Shift | Overhead streetlight rhythm |
| The Park | Upper deck of the central parking building, reached via the rear mold slope | Rebuild the damaged cab |
| Underpass | Research-area ledge in the Deeper Underpass | Lights during a blackout |
| The Unknown | Southern island by the Patterned Evac Building | Shadows cast with a portable light |
When you get close, the cab honks and flashes; it appears on the map. Inspect it and use the passenger-side interaction to enter. The Downtown screenshot below shows what a discoverable cab looks like in traffic.
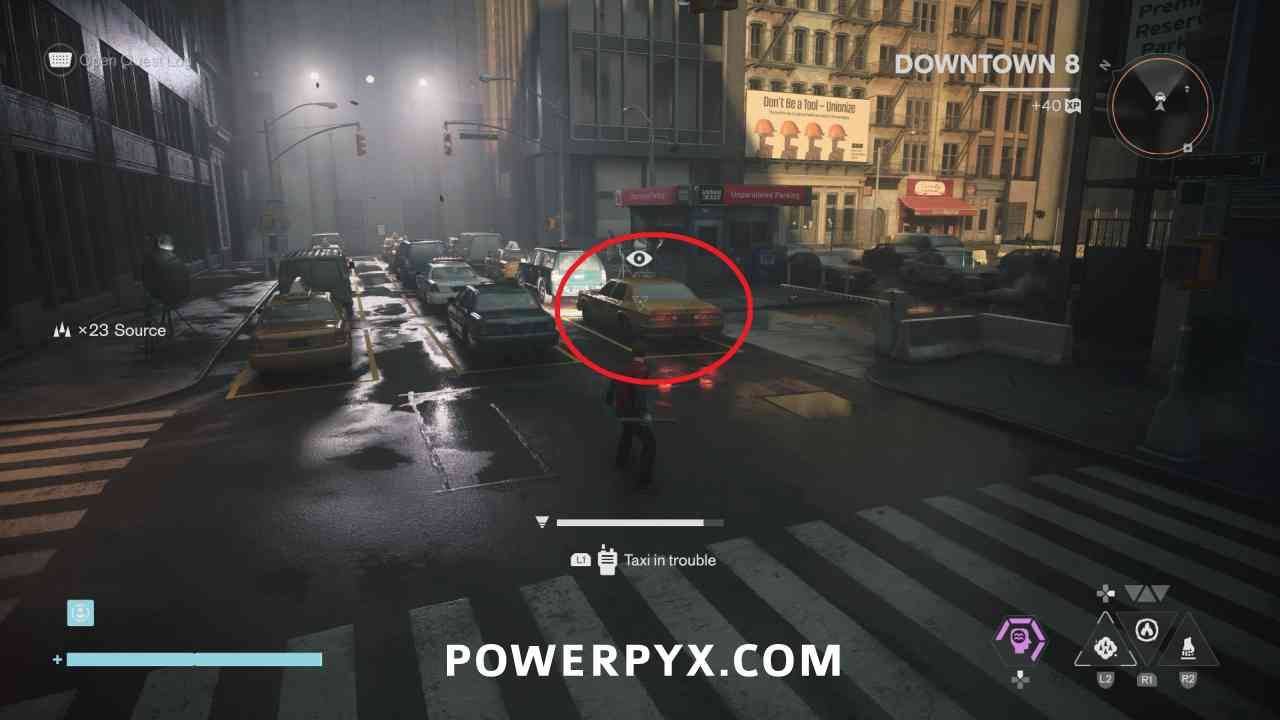
Source image: PowerPyx's Last Taxi walkthrough.
How to read the three-round puzzles
After answering the phone, step back far enough to see all candidate cars and the nearby fixtures. Look for a single outlier in the current round. A clue may belong to the car's headlights, taillights, roof sign, the streetlight above it, or its shadow. Some solutions change when you approach a cab, and some require watching a full blinking cycle. The green traffic light tells you a round counted; use it as feedback before moving to the next pattern.
Downtown: roof signs react to proximity
In the first round, enter the cab whose TAXI roof sign is already lit. For the second, walk toward the lit cabs and watch which sign remains illuminated when you stand beside it. In the third, approach the apparent wrong cars and look farther down the street: the correct car's roof light responds to your presence at a distance. Staring at a fixed row without moving will miss the mechanism.
Central: compare the front, back, and roof
The Central cab is in the alley west of the Patterned Factory. Circle the candidates so you can see both ends. The first distinction is a lit front; later rounds use the roof sign and a combination of front and rear lighting. Source walkthroughs describe the exact round sequence differently, and players report that expected flashes or sounds are sometimes absent. Use the unique light configuration actually visible in your current round. If the row seems motionless, compare which fixtures are steadily on.
Evacuation Zone: wait for the entire blink loop
Reach the cab through the alley near the Evac Building's hazards. Round one singles out the headlight rhythm that falls out of step with the group. In round two, one car gives a rapid double flash. In round three, the outlier stays dark instead of blinking. Watch a full loop before selecting, especially for the brief double flash.
West Incursion Zone: watch the streetlights, not the cars
Climb above Empire Avenue Station with Shift and enter the cab in the high parking area. Here the overhead fixtures are the clue. Choose the cab below the only flickering streetlight in the first round, the only steady light in the second, and the light that stutters out of rhythm during the common pause in the third. Stand back to keep all lamps in view.
The Park: repair the taxi
The cab is on the upper level of the central parking building. Go around the back, climb the blue mold slope, and enter the upper deck. Inside the Threshold, remove the gray mold from the vehicle and install the matching yellow parts. Early stages need the yellow hood and trunk, then a hood and two wheels. In the final stage, clear the smaller linked mold growths before the central mass and fit the matching hood, TAXI sign, front quarter panel, trunk lid, and rear grille. The blue hood and police light bar are decoys.
Underpass: judge the cars during darkness
The research-area cab is reached from the Deeper Underpass, along the route opened during Recursions and Iterations. The streetlights periodically cut out. In the first round, find the roof sign that stays lit during the blackout. In the second, choose the cab that turns fully dark when the lights go out. In the third, watch for the brief roof-sign flash that appears only in the blackout. Do not decide based on the bright portion of the cycle.
The Unknown: use a hand light to read shadows
The last cab waits near the Patterned Evac Building on the southern island, behind late-story access. Take the portable light near the Threshold entrance and shine it from behind the vehicles. In the first round, the true taxi silhouette differs from the decoys. In the later rounds, inspect the shadow's roofline for the rectangular TAXI-sign bump; the cars themselves can look identical.
Finish Mila's story
After the seventh cab, return to the alley payphone and answer the final call. Mila says she has seen a woman and intends to follow her; the dialogue does not resolve her fate. The side story contributes to the Threshold Researcher completion route described in the trophy guide.
If you want another zone-by-zone side story, Every Dog Has Her Day follows a dog and blue toy through Manhattan. The walkthrough helps if a zone is not yet accessible, and the guide hub is the main index for every route.
Sources and notes
Game details are based on the linked guides and supplied research. They have not all been independently tested in game.